How
to Use a Router to Make a Printer a Wireless
Networking a
printer allows you to print to the device wirelessly from any connected network
computer. This may save your business both money and office real estate by reducing
the number of printers needed. You can connect almost any printer to your
network, although the networking method you select may vary depending on your
printer hardware.
Network-Ready
Printer
1. Connect one end of the Ethernet
cable to the port found on the printer and then connect the other end of the cable to an
available port on your router. Alternatively, you can connect the printer to an
available network wall jack.
2. Press the power button to turn on
the printer. Wait at
least two minutes for the printer and the router to communicate before
proceeding.
3. Use the control panel of the
printer to print a configuration page. The page contains networking information, including the IP
address assigned to the printer. Alternatively, you can use the control panel
to assign an IP address to your printer. The actual steps necessary to print
the page and to configure the IP address vary depending on the manufacturer and
model of your printer. Refer to your owner’s manual for the information
specific to your printer.
4. Install the print software on any
network computer you want to gain access to the printer. Use the installation CD that shipped
with the printer and follow the onscreen instructions to install the software.
Enter the IP address that appears on the configuration page you printed when
prompted. Alternatively, search for the printer among available network
devices. Reboot your computer to complete the installation. The installation
process may vary depending on your specific model of printer.
USB Printer
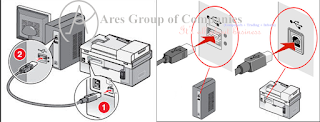
1. Follow the
manufacturer’s instructions to connect the printer to a computer and install
the print software if you have not already done so.
2. Enable File and Print Sharing on
the computer directly connected to the printer. Click Start followed by “Control
Panel” and then type “Network” in the Search box located in the top-right
corner of the Control Panel screen. Select “Network and Sharing Center” from
the options that appear on the left and then select the “Change Advanced
Sharing Settings” option. Click to enable the “Turn on File and Printer
Sharing” option and then click the “Save Changes” button. You may receive a
prompt to enter an administrator password depending on your computer’s security
settings. Close the Windows Control Panel.
3. Click Start followed by “Devices
and Printers” to open the Devices and Printers dialog box.
4. Browse the available printers until
you find the one you want to share. Right-click the printer and click “Properties” from the
options that appear.
5. Click the “Sharing” tab to view the
Sharing properties for the printer. Click to select the “Share this Printer” option. A check
appears in the box when you enable this option. Click “Apply” and “OK” to save
the changes and close the printer dialog box. Close the Devices and Printers
dialog box. The printer now is available to other networked computers to use
wirelessly.
6. Add the printer to any networked
computer you want to have access. From the networked computer, click Start followed by
“Devices and Printers.” Click the “Add a Printer” option and then click “Add a
Network, Wireless or Bluetooth Printer” option. Select the printer from the
list of available printer, click “Next” and then follow the onscreen prompts to
complete the installation.
Equipments
- Ethernet cable (optional)
Tips
- You can also connect parallel
port and USB printers to your network using a wireless print server. The
process of connecting and installing the printer varies depending on the
model of print server purchased.
Warning
- When sharing a printer through a
computer, you must leave the connected computer powered on for others to
gain access to the printer.


0 comments:
Post a Comment